1. Open Adobe Photoshop Elements
2. Select New to create a new image.
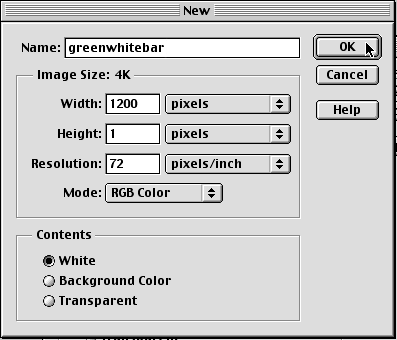
3. Give it a descriptive name (lower case without spaces) and change the width to something like 1200 pixels, Height to 1 pixel, as in the example below. Click OK
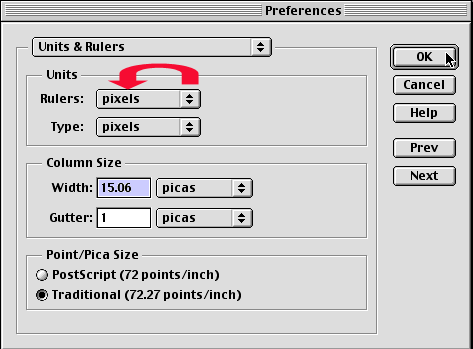
4, Change the Unit Preferences to Pixels. You want to view this in Pixels, not Inches! Pixels refer to screen size and are used to develop web pages. Go to File > Preferences > Units & Rulers... Change the Ruler Units to Pixels and Select OK.
5. Click on View > Show Rulers to see the number of pixels in the bar being created.
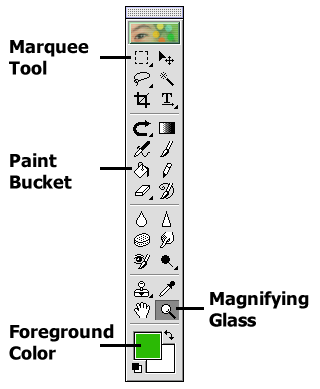
6. On the tools palette shown on the right, double click in the middle of the Foreground Color to open the Color Picker dialog box. Choose any color you desire. [If the tools palette is not open, go to Window > Show Tools to open it.]
7. Select the Magnifying Glass in the tool palette.
8. Click on the bar two or three time to enlarge it. To shrink the bar, hold the Alt or Option keys while clicking. When you hold the Alt/Option key, notice that the middle of the magnifying glass turns from a "+" to a "-".
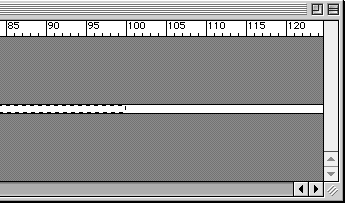
9. Resize the window by clicking and holding the bottom right corner of the window and dragging it to the right. Make sure the units 0 through 100 are visible at the top of the window.
10. Click on the Marquee tool in the tool palette.